
Week 5: Building a basic sound controller in Flash Professional 8
When you are first exposed to Flash Professional 8, it is understandable that you immediately want to lay in a sound track. The inevitable frustration that sets in arises as you discover the process of adding sound to a Flash movie is actually quite simple. That may sound contradictory but it is true. The complexity and depth of Flash makes one think, "Hold on. This is a complex application so adding sound will also be complex." The problem is, the users make it complex. It doesn't help when Macromedia, through a number of Dev Center articles, adds to the frustration. The result is a bunch of frustrated people who "over thought" the task at hand and made life more difficult for themselves.
In this lesson I will demonstrate two very basic techniques for working with sound in Flash MX. The first uses a sound embedded in a Movie Clip, and the second creates a very simple sound object that uses a button click to turn a sound off or on. Also, being the "Integration Guy" around here, I should tell you all of the assets used in the Record Player were created in FreeHand MX. The funky, funky tune was created by a talented young artist in Toronto named Shawn Butchart.
To get started , download the files and open the EX1.fla file in the Exercise folder.
Planning the interface
Back in the late 90's, I picked up a sampler album put out by OM Records. The first track of the CD contained a Director presentation that started with the user being asked to put the needle on a record. When the user did that, a track from the album played. I always thought this was really neat way to engage the user in the experience and to "reinforce" the brand.
Here's the plan:
- The Flash animation opens and the user sees a record and a tone arm on the screen. The word- "Drop the needle" - tells the user to what to do.
- The user rolls over the head of the tone arm which then moves onto the record.
- The record starts spinning and the tune plays.
- The user rolls off the tone arm and the arm leaves the record, the spinning stops and the sound stops playing.
Try it:
Flash 1: The first version of the player.
How it works:
First off this is going to be "dead simple". You only need a two-frame Flash movie to pull this one off.
The tone arm is actually a Flash button, and the spinning record is nothing more than a very simple Movie Clip. When the button is activated the playback head moves to Frame 2 of the movie. Located in this frame are the spinning record and another Movie Clip containing the sound.
A "Stop" action and a line of code to "kill the sound" are located in Frame 1. The tone arm will have an action attached to it that tells Flash to move the playback head to the next frame. When the playback head arrives in Frame 2 another Stop action will hold the playback head in place. There will also be a small amount of ActionScript attached to the tone arm that simply says when the user rolls off of the tone arm to move the playback head to the first frame of the movie.
Building the Interface Elements.
Flash is a vector app so it only makes sense to use FreeHand MX to create the various interface elements. For this one I will need to create the record, the background and the tone arm.
Back in the early days of Flash, around version 4, I had the pleasure of attending a rather intimate seminar given by Hillman Curtis. One technique I picked up from him was to create a symbol that either matches the stage color or covers the stage. This way you control the stage color and/or any backgrounds appearing on the stage. The stage for the Flash movie is going to be 250X 180. The background I created was 260 by 190 to give me a little bit of overlap to ensure the stage is completely covered.
Once the images were created they were imported into the Flash Professional 8 Library. I prefer to to do this as a matter of convenience. First off everything I import is in one place — the Library — and secondly, I only have to bring the elements I need onto the Stage when I need them. With the interface elements in place, I imported the sound into the Flash Library.
With all the assets in place, I could go to work. The first thing I did was to create a new movie clip. This clip will be the "Spinning Record." I dragged the record symbol from the Library into Frame One, and added key frames at frames 7,14,21 and 28. I then selected the key frame at Frame 7 and selected Modify, Transform, Rotate 90 CW. I then right-clicked (Control-Click...Mac) between frames 1 and 7, and selected Create Tween from the Context menu. I repeated this for the key frames in frames 14 and 21. I then added a new layer, named it "Actions" , added a key frame in Frame 28 and, with the new key frame selected opened the Actionscript Editor by pressing F9 or selecting Window, Development Panels, Actions. I added the following code:
goToandPlay(1);
That bit of code creates an endless loop and is what keeps the record spinning..
The next Movie Clip created will hold the sound. Though you can place the sound on the main timeline this is no longer regarded as a "Best Practice" in Flash development. There is also a rather neat way of using this Movie Clip which I get into later in the tutorial.
The final asset was the tone arm. In the interests of expediency I created it as button in Flash Professional 8. Thus all the user has to do is roll over the needle and things get underway.
Building the Record Player.
This technique is a "Down and Dirty" way of getting a sound to play. It works, but most "Flashies" would tend to look down their nose at how I do it. In certain respects I agree, but we'll get into that later. Here's how to build the first example:
- Open the file Ex1.fla and change Change the stage size to 250 X 180. You will note I have added the
following layers:
- Actions
- Text
- Sound
- Tone Arm
- Record
- Background
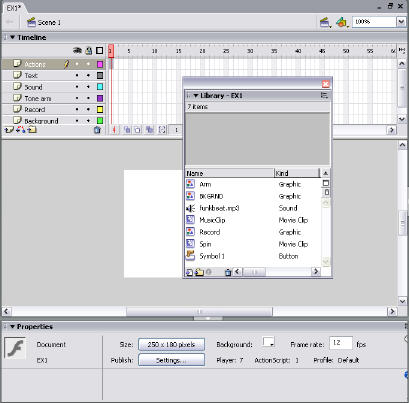
Figure 1 : The Layers are in place. The stage is set and content in the Library is ready to be placed on the stage.
- Add a key frame to Frame one of the Background Layer and Drag the BKGRND image from the Library into the that frame. Add a key frame to Frame 2 of the Background Layer. This is done by selecting the frame, Right Clicking (PC) or Control-Clicking (Mac) and selecting Insert Keyframe from the Context Menu.
- Create a key frame in Frame 1 of the Record layer Drag the Record symbol from the Library into Frame 1 of the Record Layer . With the image selected, write down its X and Y coordinates as shown in the Property Inspector.You will need these coordinates for the Spinning Record.
- Create a key frame in Frame 1 of the "Tone arm" layer and drag the Tone Arm button into the key frame just created. To get this just right, select Control > Enable Simple Buttons, or press Control-Altt-B (PC) or Command-Option-B (Mac) to turn the button on. Rollover the needle. If it isn't where it is supposed to be, turn off Enable Simple Buttons and move the Tone Arm button around until you get it right. Add a key frame to frame 2 of the Tone Arm Layer.
- Add a blank key frame to Frame 1 of the Sound Layer. Add a key frame to Frame 2 of the "Sound" layer and drag the "Funk" Movie Clip anywhere onto the stage in Frame 2. This is a really neat technique. In this manner you will have the sound play because it is in a Movie Clip and not have to worry about the sound in the timeline.
- Add a key frame to Frame 1 of the "Text" layer, select the Text Tool, click on the stage and enter the words "Drop the needle" onto the stage . If you are a real purist, select the words and convert them to a Graphic Symbol by selecting Modify, Convert to Symbol or pressing the F8 key. This way, you get access to many of the effects of the Property Inspector such as the ability to fade the words by lowering their opacity.
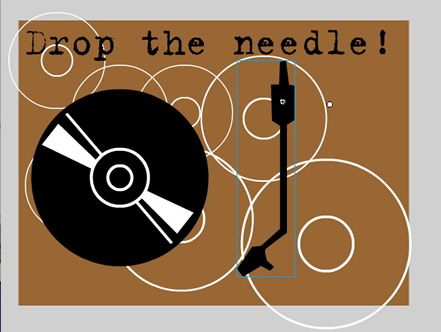
Figure 2 : The assets are on stage ready to be "wired up" with ActionScript.
"Wiring up" the Record Player
As I pointed out at the top of this piece the code is "dead simple". To stop "over thinking it", tell the story instead. When the user puts the tone arm on the record the music plays. When the tone arm is taken off of the record, the music stops. Simple.
What this tells you is:
- No music is to be playing in frame one because the record isn't spinning.
- To ensure this, the ActionScript has to stop the play back head on frame one and kill the music.
- When the Tone Arm button is activated the movie skips to frame 2. In this frame, the playback head is held in place, the record starts spinning and the music starts playing.
- Rolling off of the tone arm turns off the music and stops the record spinning. This means rolling off, navigates you back to frame 1.
Here's how to "wire it up" with ActionScript:
- Add a key frame to Frame 1 of the Actions Layer. With the frame selected either press F9 or select Window > Development Panels > Actions to open the ActionScript Editor. Enter the following code:
stop();
stopallsounds();
The first command stops the playback head dead in its tracks. The second kills all sounds that are currently playing. It is one of the more powerful commands at your disposal when it comes to sound. Sounds in Flash aren't frame based. They keep playing regardless of where the playback head is located, and this command lets you control them.
Now that we have handled the sound and playback head movement issue, it is time to manage the navigation. Navigation to frame 2 will be managed by the tone arm button. In order to ensure this works, a button needs to be selected on the stage and not the key frame. Do this and you will control the playback head - the little "a" in the frame tells you it is a frame script - and wind up with a whack of script errors.
- Click once on the Tone Arm on the stage and open the ActionScript editor. Enter the following code:
on (rollOver) {
gotoandplay(2);
}
All this says is,when the tone arm is rolled over, scoot the playback head to frame 2.
- Add a keyframe to Frame 2 of the Actions Layer and add the following script:
stop();
- Select the Tone Arm on the stage and enter the following code:
on (rollOut) {
gotoandPlay(1);
}
Look familiar?
That's it. The project is finished. Publish the movie or save the movie and select Control, Test Movie (Control-Enter for PC users or Command-Enter for Mac users.) This will create the .swf and show it to you in the Bandwidth profiler.
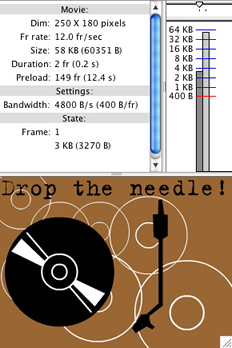
Figure 3: The project being previewed in the bandwidth profiler.
Creating a Sound Object in Flash Professional 8
Though "Sound Object" may, on the surface, appear to be a relatively intimidating term it is quite simple to understand In very simplistic terms you tell Flash where the sound is located in the Library, give it a name and from that point on Flash remembers both the the sound and its location. What this does is to make sound interactive. Instead of a linear sound, chained to the timeline, a sound is now responsive to mouse location, clicks, object collisions and a host of other events controlled by Actionscript.
The key to this is the sound object. The beauty of this object is it can refer to a sound in the Library, a sound in a movie clip or even an MP3 file located on a server. In this case the sound can either stream into the Flash movie through the Flash Communication Server MX or Progressively Download much like an FLV file sitting on a server.
Here's the presentation we will create:
Flash 2: The second player uses buttons.
As you can see, the entire piece is controlled by the two buttons which come "packaged" with Flash Professional 8. They are located in Window > Other Panels > Common Libraries > Buttons. I chose the "Play" and "Stop" buttons from the Circle Buttons folder. The neat thing about these is they come "pre-rolled". By that i mean the UP, Over, Down and Hits states are already set.
How it works
The Sound Object is created in the Actions Frame. When the Play button is clicked , there is a "call" to the object, the sound is found and the movie plays. When you click the stop button you will tell Flash to "stop all sounds". That's all that needs to be done.
The interesting aspect of this Object is that, in Flash animations where a number of sounds can be used, each sound can now be contained in a Sound Object and separately managed. This, for example, is how MP3 players created in Flash allow you to play a number of songs. Each one is contained in its own Sound Object.
Building the Sound Object
As I have been saying all along, the creation of a sound object is dead simple. It will be created in the first frame of the movie and will "call" a sound in the cast. Here's how:
1. If you haven't already, download the files for this tutorial and open the EX2.fla file located in the Project folder.
The first thing you need to do is to give Actionscript a pointer to the Sound Object. This is done through the Linkage properties.
2. Open the Library, and either Right-Click (PC) or Control-Click (Mac) the file named "funkbeat.mp3" . This will open the Context menu. Select "Linkage" and the Linkage Properties dialog box, shown below, will open.
3. If the identifier area is blank or greyed out, click the "Export for ActionScript" box. Doing this tells Flash that ActionScript can access the sound.
4. Enter a name in the Identifier area. I chose "funk" to avoid confusion. I could just as easily have used the file's name "funkbeat" but I prefer to keep these things different so I can tell what I am working with. Click OK to close the Linkage Properties dialog box.
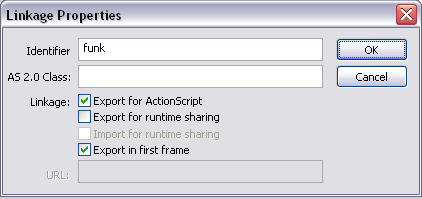
Figure 4 : The Linkage Properties make the sound available to ActionScript.
5. Add a key frame to Frame 1 of the Actions layer . Open the ActionScript editor and enter the following script:
tune = new Sound();
tune.attachSound ("funk");
stop();
The first two lines create the Sound Object. In fact, the purists will argue it is the first line. Either way the first line simply creates a variable named "tune" which Flash recognizes as the name for a new sound. Flash has to be told which sound gets used. The "attachSound" does that, and the name of the sound, from the Linkage Properties, is the one to be used.
6. Select the Play button on the stage. open the ActionScript editor and add the following code:
on (press){
tune.start();
}
All this does is to tell Flash, when the Start Button is pressed start playing a thing named "tune". That "thing" is the Sound Object pointing to the sound in the Library.
7. Select the Stop button on the stage, open the ActionScript editor and add the following code:
on (press) {
stopallsounds();
}
Alternatively, if you have a number of sounds playing, you can have just that sound stop by using this code:
on (press) {
tune.stop();
}
8. Save and test the movie.
Conclusion
I have demonstrated two ways you can use Flash Professional 8 to play a sound. The first technique simply plays a sound located in a movie clip sitting on the stage. The second, more powerful technique, is to actually create a Sound Object. Again, this technique is relatively simple to understand and employ.
Even more important is understanding if you can create one object you can create a bunch more. This opens up a huge number of possibilities and the only limit to realizing those possibilities is your creativity.
 This work is licensed under a Creative Commons License.